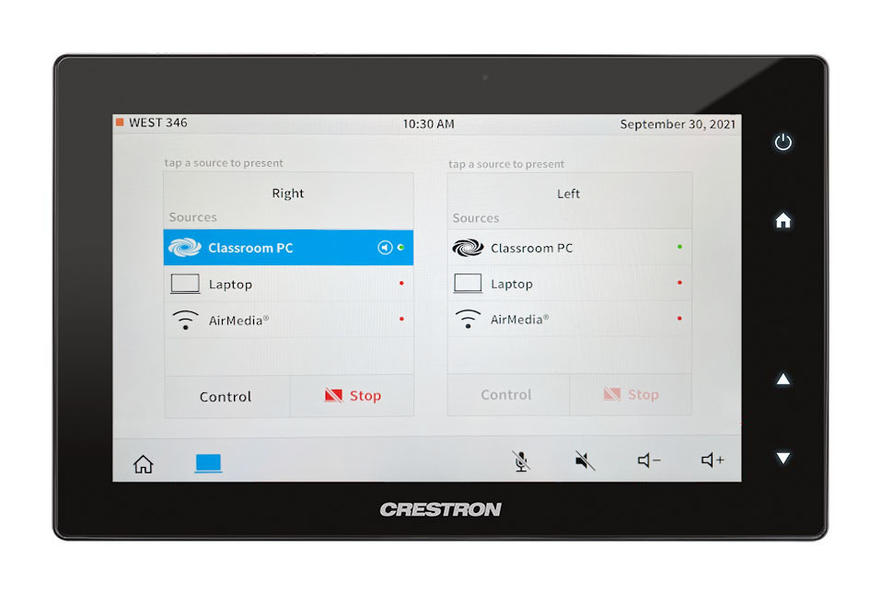
This space has two displays. Each one gives the option to display from the Classroom PC, a Laptop or AirMedia. These features provide the ability to display multiple screens at once.
Getting Started
- To wake the screen, tap the Crestron touch panel located on the podium or the wall.
- On the Home screen, tap "Press Here to Start" or the screen icon (second tab at the bottom of the touch panel) to get to the Source screen.
- Note: Both Left and Right can display the same screen, just select the same source under each location.
Using the Classroom PC
- On the touch panel Source screen, tap the Classroom PC option for the desired location.
Using a Laptop
- Plug the proper display cable, located on the podium, into your laptop.
- On the touch panel Source screen, tap the Laptop option for the desired location.
Wireless Presentation
- On the touch panel Home screen, tap the screen icon (second tab at the bottom).
- On the touch panel Source screen, tap the AirMedia option for the desired location.
- The AirMedia IP address will be provided on the classroom display.
- On your computer, enter the IP address in the browser.
- Click the link to download the appropriate client (Mac or Windows).
- Once downloaded, launch the application, and enter the code shown on the classroom display.
Audio Settings
If the audio isn't projecting through the classroom, ensure the proper output is selected and the volume is adequate.
- Click the sound icon, located in the bottom right corner of the computer screen.
- In the Select playback device menu, the Crestron option should be selected.
- The volume can be adjusted from the computer or the Crestron touch panel (bottom right corner).
- There are also mute buttons for the volume and microphone in the bottom right corner of the touch panel.
Pause/Stop Sharing
- To pause sharing:
- Under the desired display, select Control.
- Tap Blank Screen, located in the top right corner of the control panel. This will pause sharing the screen, including the volume.
- Tap Resume in order to continue sharing the screen.
- To stop sharing:
- Under the desired display, select Stop.
Powering Down:
- Tap the glowing power button in the top-right of the touch panel.
- A 30 second countdown will begin. (If you need to cancel the shutdown, click “Continue Use”.)
Troubleshooting
- Adjusting the volume:
- Every Crestron touch panel screen has volume control buttons located in the bottom right corner. There are also mute buttons for the volume and microphone.
- Display both projectors at once:
- Select the desired sources for both projectors at the same time.
- If further assistance is needed, contact the Help Desk at 910.521.6260.

If the classroom has the newer Crestron touch panel, the power button is accessed via a horizontal bar at the top of the screen. Touch the bar and swipe down, then tap the power button. A 30 second countdown will begin. (If you need to cancel the shutdown, click “Continue Use”.)

